- Views 6293×
- Blog home
-
Share on Twitter

After several courses I took on Coursera, I have got a chance to apply machine learning on a real project – computer digit classification in PHP web applicaton. Lots of blog posts show you how to develop model that reads prepared data, displays model accuracy and loss, than describe some hyperparameters tuning and the results. I was (quite deep) digging for informations how to implement whole proces in real application. From data preparation and trained model implementation. So this post has this primary goal – describe the whole process.
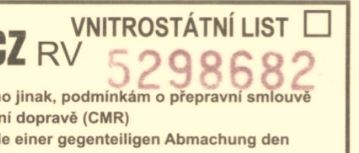
The application was allready working but very often with poor accuracy on OCR digit classification. It reads sheet number from scanned A4 .jpg file. The file is uploaded by user and application should automatically reads digits sheet ID from top right corner and save ID and the file path to database.
Often the scanned sheet was a bit rotated, blured and with some noise around digits. We tried two PHP OCR libraries to evaluate the area with digits simultaneously. But still we got quite often wrong digits (3 evaluated as 6 etc.) even when the digit conditions were fine.
So I decided to sum up the process I went through and what helps me to realize how to develop a machine learning project, so the whole ML puzzle fits together. Think of it as an advanced "Hello world" in machine learning and bear in mind it was my first ML project.
Lots of blog posts show you how to develop model that reads prepared data, displays model accuracy and loss, than describe some hyperparameters tuning and what was the results. I was (quite deep) digging for informations how to implement whole proces in real application. From data preparation and trained model implementation. So this post has this primary goal – describe the whole process.
The application solve computer vision task and the convolutional neural network (ConvNet) is go-to for this type of classification. Why not plain neural network? Because with ConvNet there is much less parameters to learn (you have smaller matrices).
Application is running on PHP and data preparation and classification is based on Python 3.6 and major part on OpenCV, TensorFlow and Keras. I was developing and training model on my local computer (i3 3,6 Ghz, GPU capable but not used) with Win 7, not using Anaconda package, just Python shell and installing only what I needed.
Environment and commands for this task:
- Python 3.6+ - (https://www.python.org/downloads/)
- TensorFlow - (https://www.tensorflow.org/install/)
- Python:
pip - OpenCV:
pip install opencv-python(https://pypi.python.org/pypi/opencv-python) - Keras:
pip install Keras(https://keras.io/#installation) - h5py:
pip install h5py - Numpy:
pip install numpy - Pillow:
pip install pillow(for Keras)
Defining the process and assembling dataset
The picture shows how the whole process is distributed:
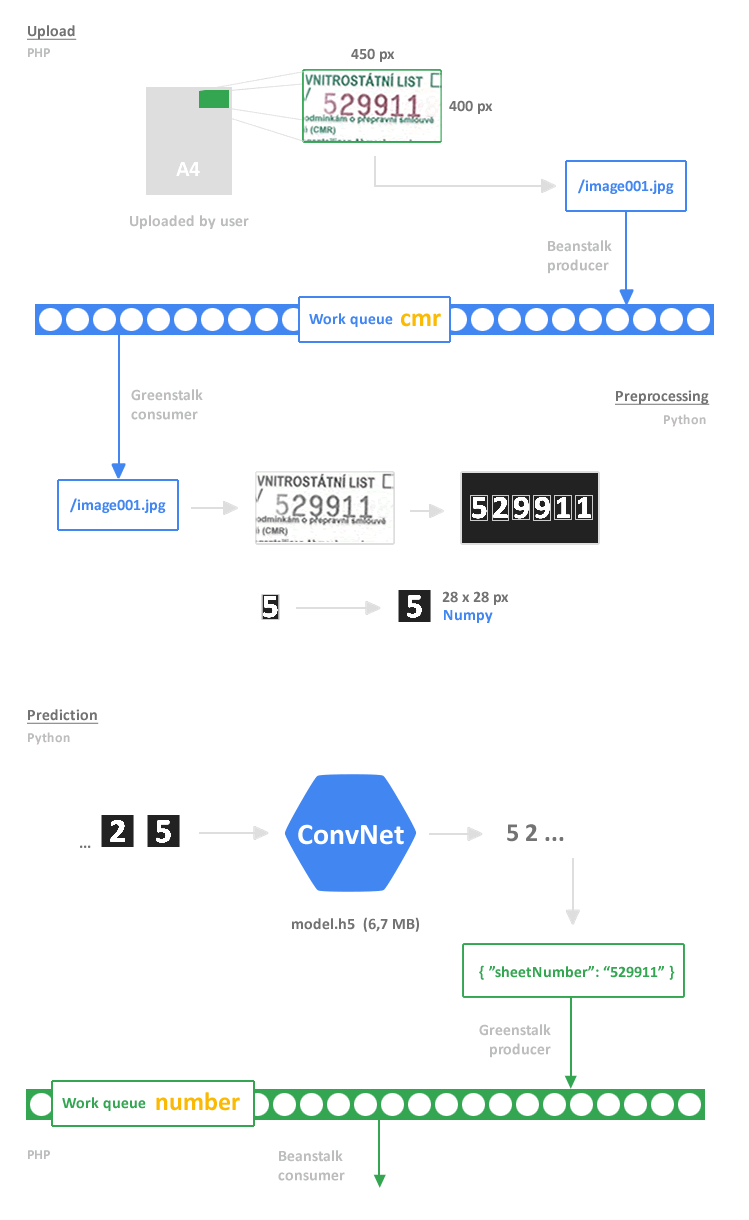
Communication between PHP and Python is through asynchronous work queue clients (Beanstalk for PHP and Greenstalk for Python).
Input data, data preparation and dataset
Before we get to building any model, we need some data, and we need to make sure this data conforms to some reasonable expectations. What will an input data be? From process distribution picture you can see that input will be one .jpg picture with such dimension, that will contain the digits even when the A4 sheet is a bit rotated. So a new copy of 450x400 px picture from top right corner is created in PHP after file upload and saved as .jpg file.
In the next step the Python script will prepare data from this picture. The OpenCV-Python library is used for image processing and I did a few image manipulations to remove noise, colors, sharpening and tune up this process to achieve the best results in finding contours and get bounding rectangles. The rectangles with specific dimension will contain the digits we need.

So we have an image rectangle (in OpenCV it is a Numpy array) and the last step in data preparation is to resize this image to 28x28 px dimension. I desided to keep same dimension as MNIST data sample – 28x28 px image for one digit. So the input for our model will be one digit, picture with 28x28 px dimension and white digit on black background.
This whole process will run on every request the user will upload scanned A4 sheet for classification.
Dataset – MNIST test
I knew that I have tools and process, that will prepare data formated in a way that can be fed into ConvNet model. So where I will take/create dataset for my model training?
One way would be to grab samples from A4 sheets. But I kept this as plan B ... at first I had around 50 A4 sheets, which is small dataset for neural network (in Keras you can increase the data size for training with real-time data augmentation). At second I wanted to see how the classification will perform when the ConvNet will be trained on MNIST dataset – lots of handwritten digits looks similar to digits my model will classify.
Another reason to start with MNIST dataset was to first build model structure and try everything put together, just to see the model is working with some data. One line in Python from keras.datasets import mnist and Keras was downloading the MNIST dataset at the first run.
I still was not sure how to train with my own dataset (data located in some directory structure). Most of the exercises in courses has datasets prepared (in h5, csv ...) and focus on model developing. But as you will see later it is very easy with Keras.
My conclusion on MNIST dataset used for training in this case
I had data for training, so I could develop ConvNet model and test his accuracy on handwritten MNIST dataset. With test accuracy over 98 % and model structure similar to the model script bellow, I fed model with computer digits. After a few experiments with test data it was evident that I have poor performance and can't implement my model to classify computer digits. The problem was often with digit 6. It was very often evaluated as number 8, 5. Try to draw number six [link] and see for your self.
I proove myself what Mr Andrew Ng is explainig in machine learning strategy course: Choose a dev set and test set to reflect data you expect to get in the feature and want to do well on.
Try to do your best to get data in quality, distribution and conditions you can expect when your project will be implemented. But on the other side try to do it quickly, say in less than a week. Implement and test your model idea, evaluate result and iterate, until you get something satisfactory.
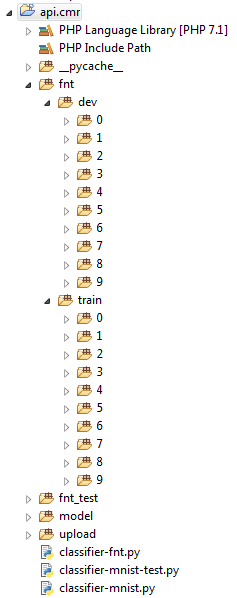
The Chars74K dataset
After some searching i finaly found The Chars74K dataset that contains 0-9, A-Z, a-z fonts – EnglishFnt.tgz package. With this package you have 1016 samples for each alpha numeric character (black digit on white background).

With OpenCV I prepared dataset for training – convert it to white digit on black background and resized images from 128x128 to 28x28 pixels, the same size my script and model will work with.
Size of the train, dev and test set
Ok, I have finaly dataset that reflects data my application will work with. Even the dataset size is around 10 000 I decided to split data by rules for large datasets. That is 98 % for training, 2 % for development/test set (used to tune parameters).
I created directory structure for model training as follows:
Model training and classification
I will skip the introduction to convolutional neural network as there is pleny of information on the internet.
I will borrow a few words from Deep Learning with Python to summarize process during model development: The ideal model is one that stands right at the border between underfitting and overfitting. Develop a model that overfits quickly. Regularize your model and tune its hyperparameters, based on peformance on the test data. After several model structures I ended up with 2 convolutional layers.
Model for digit classification.
import numpy as np

from keras import layers
from keras.layers import Input, Dense, Activation, ZeroPadding2D, BatchNormalization, Flatten, Conv2D
from keras.layers import MaxPooling2D
from keras.models import Model
from keras.utils import np_utils
from keras.preprocessing.image import ImageDataGenerator

NUM_CLASSES = 10
NUM_TRAINING = 9960
NUM_DEV = 200

BATCH_TRAIN = 83
BATCH_DEV = 8

PATH_TRAIN = 'fnt/train'
PATH_DEV = 'fnt/dev'

# dataset
generator = ImageDataGenerator(rescale = 1./255)
train_generator = generator.flow_from_directory(PATH_TRAIN, target_size = (28,28),
batch_size = BATCH_TRAIN, color_mode = 'grayscale', classes = ['0','1','2','3','4','5','6','7','8','9'])

validation_generator = generator.flow_from_directory(PATH_DEV, target_size = (28,28),
batch_size = BATCH_DEV, color_mode = 'grayscale', classes = ['0','1','2','3','4','5','6','7','8','9'])


# model
def digitClassifier(input_shape, classes):
    x_input = Input(shape = input_shape)

    # CONV -> BN -> RELU Block
    x = Conv2D(32, (5, 5), strides = (1, 1), name = 'conv0')(x_input)
    x = BatchNormalization(axis = 3, name = 'bn0')(x)
    x = Activation('relu')(x)

    x = MaxPooling2D(pool_size = (2,2), name = 'max_pool0')(x)

    # CONV -> BN -> RELU Block
    x = Conv2D(64, (5, 5), strides = (1, 1), name = 'conv1')(x)
    x = BatchNormalization(axis = 3, name = 'bn1')(x)
    x = Activation('relu')(x)

    x = MaxPooling2D(pool_size = (2,2), name = 'max_pool1')(x)

    x = Flatten()(x)
    x = Dense(512, activation = 'relu', name = 'fc1')(x)
    x = Dense(classes, activation = 'softmax', name = 'fc2')(x)

    model = Model(inputs = x_input, outputs = x, name = 'digitClassifier')

    return model


model = digitClassifier((28,28,1), NUM_CLASSES)
model.compile(optimizer = 'adam', loss = 'categorical_crossentropy', metrics = ['accuracy'])

model.fit_generator(train_generator, steps_per_epoch = NUM_TRAINING // BATCH_TRAIN,
epochs = 8, validation_data = validation_generator, validation_steps = NUM_DEV // BATCH_DEV)

# after training and parameters tuning, I saved the trained model to file
# model.save('model-classifier.h5')

preds = model.evaluate_generator(validation_generator, steps = NUM_DEV // BATCH_DEV)

print ("Loss: " + str(preds[0]))
print ("Test Accuracy: " + str(preds[1]))
print ("Error: %.2f%%" % (100-preds[1]*100))
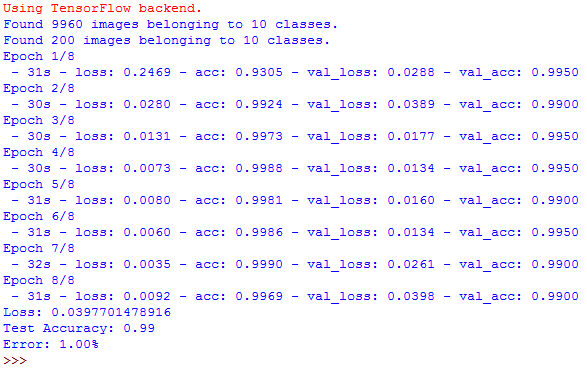
Training with Keras ImageDataGenerator for dataset augmentation was very effective. The ConvNet model with 2 conv layers has very good results for data we will feed in.
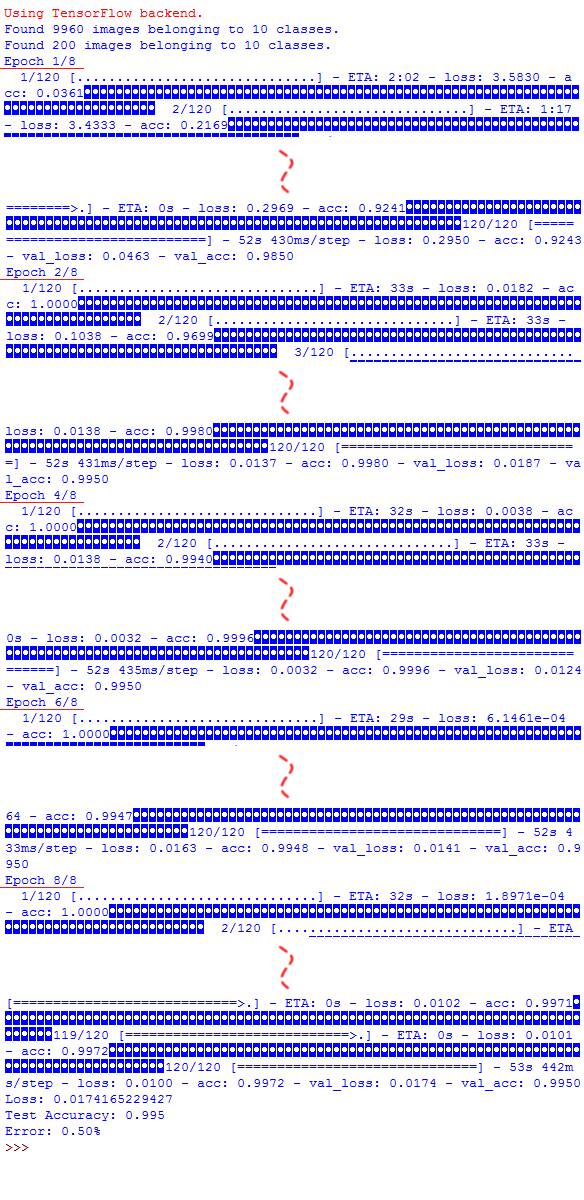
verbose = 1.After 2nd epoch is model accuracy over 99 %.
verbose = 2.Model implementation and prediction results
After model training, the model is saved to file model-classifier.h5. So the core for classification is ready for implementation. The classifier script reads image path from work queue/pipe named cmr. The image is preprocesed and selected digits are converted to 28x28 px Numpy array object. Every digit is classified in the model. The final result, sheet ID, is send to the queue named number. The PHP consumer reads from number queue the classification result.
Example of producer.php
<?php
require_once 'vendor/autoload.php';

use Beanstalk\Client;

$beanstalk = new Client();
$beanstalk->connect([
    'host' => '192.168.50.5',
    'port' => 11300
]);
$beanstalk->useTube('cmr');
$beanstalk->put(
    50, // Give the job a priority of 50.
    0,  // Do not wait to put job into the ready queue.
    60, // Give the job 1 minute to run.
    json_encode(['image' => 'upload/part.jpg']) // The job's body.
);
$beanstalk->disconnect();
Python consumer and classification files.
import os
import sys
# suspend errors
stderr = sys.stderr
sys.stderr = open(os.devnull, 'w')

import greenstalk
import json
import classifier

PIPE_NAME = 'cmr'
PIPE_OUT_NAME = 'number'
PIPE_HOST = '192.168.50.5'
PIPE_PORT = 11300

with greenstalk.Client(host=PIPE_HOST, port=PIPE_PORT, use=PIPE_NAME, watch=PIPE_NAME) as queue:
    while True:
        try:
            job = queue.reserve()
            pipeRead = json.loads(job.body)
            queue.delete(job)

            cmrDigits = classifier.classify(pipeRead['image'])

            strNum = map(str, cmrDigits)
            strNum = ''.join(strNum)
            pipeSend = json.dumps({
                'sheetNumber': strNum
            })

            queue.use(PIPE_OUT_NAME)
            queue.put(pipeSend)

        except Exception as inst:
            queue.bury(job)
            print(type(inst))
            print(inst.args)
            print(inst)
File for classification.
import os
import sys
# suspend tensorflow errors
os.environ['TF_CPP_MIN_LOG_LEVEL']='2'
stderr = sys.stderr
sys.stderr = open(os.devnull, 'w')
import numpy as np
import cv2
from keras.models import load_model


MODEL_FILE = 'model-classifier.h5'


def normalizeInput (x):
    x_norm = x / 255
    x_norm = x_norm.reshape(1, 28, 28, 1).astype('float32')

    return x_norm


def resizeImage (img):
    '''
    Resize img 28x28
    '''

    target_size = 22 #width and border = 28
    border_width = 3

    old_size = img.shape[:2]
    ratio = float(target_size)/max(old_size)
    new_size = tuple([int(x*ratio) for x in old_size])

    delta_w = target_size - new_size[1]
    delta_h = target_size - new_size[0]
    top, bottom = delta_h//2, delta_h-(delta_h//2)
    left, right = delta_w//2, delta_w-(delta_w//2)

    img = cv2.resize(img,(new_size[1],new_size[0]), 0, 0, interpolation = cv2.INTER_AREA)

    new_img = cv2.copyMakeBorder(img, top, bottom, left, right, cv2.BORDER_CONSTANT, value=[0,0,0])
    new_img = cv2.copyMakeBorder(new_img, border_width, border_width, border_width, border_width, cv2.BORDER_CONSTANT, value=[0,0,0])

    return new_img


def classify (imgFile):
    '''
    ConvNet prediction
    '''

    # preprocess file
    img = cv2.imread(imgFile)
    bwimage = cv2.cvtColor(img,cv2.COLOR_BGR2GRAY)
    bwimage = cv2.fastNlMeansDenoising(bwimage, None,15,7,21)

    clahe = cv2.createCLAHE(clipLimit=1.5, tileGridSize=(8,8))
    bwimage = clahe.apply(bwimage)

    bwimage = cv2.GaussianBlur(bwimage, (5,5), 0)
    bwimage = cv2.adaptiveThreshold(bwimage,255,cv2.ADAPTIVE_THRESH_MEAN_C,cv2.THRESH_BINARY_INV,17,5)

    kernel = cv2.getStructuringElement(cv2.MORPH_CROSS, (3, 3))
    bwimage = cv2.morphologyEx(bwimage, cv2.MORPH_CLOSE, kernel)

    imgseg, contours, hierarchy = cv2.findContours(bwimage, cv2.RETR_EXTERNAL, cv2.CHAIN_APPROX_SIMPLE)

    # select only contours with dimension similar to digit
    digit_rectangles = []
    for c in contours:
        (x, y, w, h) = cv2.boundingRect(c)
        if (w >= 21 and w <= 30) and (h >= 37 and h <= 43):
            digit_rectangles.append((x, y, w, h))

    # sort by x position
    digit_rectangles = sorted(digit_rectangles, key=lambda x: x[0])

    # prediction
    model = load_model(MODEL_FILE)
    cmrDigits = []
    for digit in digit_rectangles:
        x, y, w, h = digit
        digit_image = imgseg[y:y + h, x:x + w]
        # 28x28
        digit_image = resizeImage(digit_image)
        prep_image = normalizeInput(digit_image)

        probab = model.predict(prep_image)
        cmr_digit = probab.argmax()
        cmrDigits.append(cmr_digit)

    return cmrDigits
Example of consumer.php
<?php
require_once 'vendor/autoload.php';

use Beanstalk\Client;

$beanstalk = new Client();
$beanstalk->connect();
$beanstalk->watch('number');

while (true) {
    $job = $beanstalk->reserve();

    $result = false;
    $json = json_decode($job['body']);

    if($json != FALSE) {
        print_r($json);
        $result = true;
    }

    if ($result) {
        $beanstalk->delete($job['id']);
    } else {
        $beanstalk->bury($job['id']);
    }
}
Conclusion
Data preparation – 80 % of Machine learning
With today's frameworks available for machine learning, building and training a model is matter of days, sometimes hours (if we omit regulatization and hyperparameters tuning). It also depends what type of problem is your model solving. But the most time consuming part of whole process in machine learning is data preparation. Before we get to building any models, we need some data, and we need to make sure the data conforms to some reasonable expectations. So good luck on data hunting.
Note: At time of finishing this blog post the application was refactored and we switch to Google cloud platform for machine learning tasks. The main reason was the processor load. The ML computing operations are solved outside the application core.
Note: Application could be used after small adjustments of classificator for reading car plates.
Footnotes
- Deep Convolutional Networks
- Applying Convolutional Neural Network on the MNIST dataset
- Handwritten Digit Recognition Using CNN with Keras
- Deep Learning with Python (Francois Chollet)